Followers (I'd love to have you join)

Showing posts with label Layout. Show all posts

Saturday, March 23, 2013

March Club kit – Later Sk8er (with a girl option)

Layout one:
The layout formula for this one was scrap lifted from the new Idea book (pg 44)
I added some bottle caps and metal cogs I found, along with some “screw head” brads.
CTMH Bakers twine, inked canvas alphabet stickers, and lots of sanding finished off this layout.
Pink Girl Option: To get the pink (Cotton Candy) paper to coordinate with this paper pack I used the My Acrylics Distressed Backgrounds, Dark Blue (Outdoor Denim) ink , and some lagoon & pear chalk inks “smugges” to make my own custom paper - Presto changeo – girl paper sk8tr
 
  
For the second layout formula I used Magician’s Choice from Jeanette Lynton’s “Magic” .
This is has got to be one of my most favorie layouts ever!

I used the Artiste Cartridge and the In Gear my acrylics for stamped gears and cog- super cute! For the additional cogs & gears I used a Provo Craft gear-embossing folder, sanding block, and out circle & scalloped punches for some contrast. Love the dry embossing and sanding affect of our white core cardstock!
Love this pocket made with Artiste

These pages have a multi layer, mating-frame for a very finished look (6 layers in all). I also used the Artiest cart for the fun gear shaped pocket and tags with just a few inches of our new chevron ribbon. 
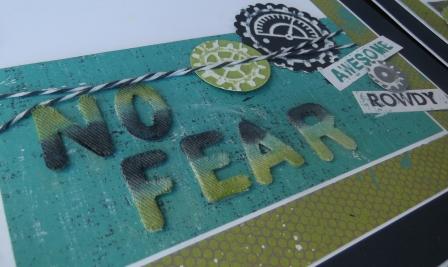
Canvas letter inked in lagoon, pear, & outdoor denim
Pink girl opption I offered my club ladies
Supplies:
  • Paper Pack: CTMH Later Sk8tr
  • Ink & paper colors: CTMH Cotton Candy, White Daisy, Crystal Blue, Pear, Lagoon, Outdoor Denim, and Slate
  • Various Metals: brads, bottle caps, gears, paper clips
  • Bakers Twin: CTMH
  • MISC: gems, clear accent sticker bubble
  • Cartridges: Artiste  (10% discount if you contact me from this post:))


Monday, February 25, 2013

La Belle Vie Layouts


Just look at these two beautiful layouts we did for our February Scrap Club.
This 1st one is my own design with a few hidden journaling spots (you know how important I think journaling is) .
I used stamp sets Jardin and Happy Valentine's (January's SOTM)
 
Of course I used the Art Philosophy and the Artiste carts for these layouts -- I may have used Elegant Edges as well.


A lot of the second layout was scrap lifted form Jeannette Lynton’s CTMH site. I did need to do some adjustments since the coordinating “my stickease” for this paper pack were already sold out. I found some stickers by My Mind’s Eye that matched very nicely.

So sorry, these papers are sold-out.

These 4 pages took us over 4 hour to complete. (Sorry we were so late Tiffany; hope we didn’t keep the girls and hubby up t o late).  Normally we are done in 3 hours. Some of the best crafting gets done well after normal hour don’t ya think?

Saturday, January 19, 2013

You Are Snow Unique

Here is the second set of pages we did for our January Club.  This layout is my own design and is entitled “You are Snow Unique”. 
 
 
 I used Art Philosophy and Cursive 101 cricut carts on this layout.
 
I found the Snowflakes at CKC convention in the fall and the blue flourish on an end cap at Joann’s – they coordinated well with the crystal blue CTMH cardstock 

Friday, January 18, 2013

Happy New Year Everyone!

Here is the first layout for our January club kit (2012 Highlights) - WOW is that bright – like highlighters – get it?

Sorry for the bad photo - I already had the flip-flaps attached to the page protector

 
Tag along -- look at all the great tags for journaling.  Remember- Journaling is a very important element to your layouts - it passes on the story for future generations long after our own memories have faded.

The only CTMH papers on this are Crystal blue, black, and white daisy cardstock.  The other papers and embellishments are something other than CTMH.  For the bright title block - I ran a mat through the xyron and put strips of ribbon over the sticky side, then used a paint pen to outline it.  I used Art Philosophy cart for the lettering and tags.   


I also used 3x3 flip-flaps to add more photos on certain month as needed.
Look at the paper-clip ribbon “bows”.  I had originally saw something like this at the craft store (six for $4) but I knew these would be super easy (and cheaper) to make on my own. 

 Enjoy!


Friday, December 28, 2012

Christmas Layouts

December Club Kit

Love love love these pages.


We used the beautiful Pear and Partridge paper pack with the Imagine cart Santa’s village.  I also used   Artiste for the accordion/rosette/medallion.  Turned out lovely.

Thursday, November 15, 2012

Fall Layouts

November Club Layouts 

These layouts feature the CTMH Flirty paper pack and Dimensional Elements.  Obviously I used my indispensable Cricut and my Imagine. 
For the 1st layout I used Hello Kitty Font (for font), and Art Philosophy for all the leaves and acorns.  I also used CTMH Stamp set Harvest Happiness to stamp all the leaves and acorns in several fall colors.  I added the CTMH Burlap Ribbon for texture.


 On the 2nd layout, I used the Imagine Enjoy the Season cart.  I just changed the colors to match the CTMH papers.  Came out so cute- I love these pages.


Happy Fall Ya’ll

Thursday, November 1, 2012

Halloween Cards & Layouts

Hi Friends,

Here are 2 cards for my kidos for Halloween. I used CTMH Artiste Cart for the gift-card holder cards. I also added an action wobble for motion.


And here are the two layouts we made in our monthly scrap club – I first designed these on the Studio-J (free to play)  then  we made them “for real” in our September Club.

Papers: CTMH Moonlight and Moonlight Workshop on the go exclusive stamp set.

Sunday, August 19, 2012

SO OLD SCHOOL (Layout)

Hey Scrapers,

I just wanted to share my layout using the papers in the CTMH Scholastic workshop on the go kit. (Our Sptember Neighborhood Club Kit)

I used the Art Philosophy for the chalkboard frame, Artiste for the card file cards and for the title, and , A Childs Year for the apple.  I was having a designer block with this paper pack, but it finally came together and looks great – better than I expected anyway.

I used the new chalkboard paper for the black board, and also used liquid glass on the apple.  I also used the cuttlebug and the woodgrain folder for the board frame.   In addition to the exclusive stamp set included in the Scholastic kit, I also used the Approved Stamp set.  I did scrap lift the card file and the stacked books from the CTMH Idea Book -- it is defiantly filed with great ideas!

Hope you enjoyed my old school layout!
God Bless and Happy Scrappin'!

Friday, July 6, 2012

MY SCRAP SPACE 2008 and TODAY

My friends and family know I can pack ten pounds of “stuff” in to a 5-pound sack and make it look like it is meant to hold that much.  Some may think that is a good skill to have, right?  Well, you first one must ask; “How did she attain such a handy skill”?  Simply put, I acquire so much “stuff” in my desire to full fill my instinctual need to gatherer (you know, that latten gene left over from more primitive times); that my packing skills have become a necessity – that is if I do not want to live in complete chaos. 

All that said, to let you know I share my craft “room” with the home office.  Have I told you we are a family very dependent on our computers?  We have five personal computers in the house with four of them having stations set-up in our 11 X 13 office.  Yes, that is five-work station in one room.  I have the larger half of the room and the three guys (DH, and 2 DS) each have a desk space on the smaller half.  That is a perfectly fare split if you ask me, after all, I have gathered more stuff.

In our previous (larger) home, I had a closet with all my “stuff” crammed very neatly into it.  I could just close the closet and no one would be the wiser about all the plunder that lurked behind.  Not only that, it was upstairs off the game room – adult gussets did not normally go up there anyway. 

My offic looked  in 2008 - 6 months after we moved in
Any hoo, when we first moved in to this house, 4 plus year ago, I had a Hodge-podge of “furniture’ used to store my crafting “stuff” and no extra closets.  It was such a sore thumb in our brand new home. After all you really can’t say, “Hey come see our new house, but please don’t look in that room with the glass doors”.  Not to mention it is off the hall next to the front door and across from the gust bathroom.  Something had to be done, and quick.  I needed the Best Scrapbooking Furniture I could find.  So I did a yahoo search on the “Best Scrapbooking Orginizer” and that is what I found.  It really is called “Best” and it is great, even fairly easy to put together and very sturdy.
 Click here if interested (they often have a 20% off code in some of the scrapbooking magazines).  I am not affiliated with them in anyway – Just a happy customer .
I didn't even have room to work

At first, my DH was not so keen on me ordering new furniture after we just spent so much on all necessities associated with a new house – so I had to wait.  I finally wore him down in time for my Birthday, and he had to admit – It was looking pretty bad! Here is what it looked like BEFORE (Big sad face).  
Over flow in the hall
It was colorful anyway


All the boxes on my front step 7 July 2008
My birthday Present arrived 2 weeks before my big day!!!  Here are the big wonderful boxes on my front porch back in July 2008.

I am the “putter together” person in the house – Just part of my spatial ability I guess.

My initial finished space - photo 7/11
It took me a while to get everything all nice and organized.  I always get messier in the processes of organizing; it is a talent that cannot be rushed. 
After some more orginizing


This is the scrapbook page I did in regard to my space.
Here is my newest addition and the prompt for this post – I just bought the hutch to the desk.  The new purchase is because, of course, I have “gathered” more “stuff”.  I also needed some space for my business supplies (all the Close to my Heart goodies (CTMH)).  For the CTMH business supplies I also bought the tuck-away that fits under the desk, but I have that over by my computer.
4 years lalter - Nice new hutch - 2012

  What you don’t see in these photos is the other half of the office, my computer area, or my Imagine (which is also sharing the other half of the office with the guys).

Okay, okay, here are some photo of the rest of the office, cat, and all.    

My cumputer spot (See the kitty ears behind print looking out window?)
The space my guy's share (3 ares on one side of the room)


And a few more shots of my craft space. 


 Hope you enjoyed the tour.
God bless and Happy Scrapin’