I also used my garage sale to see if I had any neighbors who
like to paper craft. I took the plunge
and became a consultant for Close to my Heart. Yes, you can buy from me on-line (upper left
corner); but what I really want to do is have crops, workshops, and classes in
my home. I absolutely love the Art
Philosophy Cricut cartridge and I think that was the biggest selling point for
me. And, I have been a stay-at-home-mom
for 15 years. Don’t get me wrong, I love
that “job”, but I am in need of a little self-steam. Hence, I take on a home
based business. Please wish me luck; my
husband gave me that, “you’re crazy, this won’t last” look.
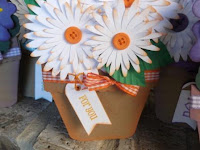
 Well, on to my most recent project – Mother’s Day Card
Flowerpots. I have seen these all over
the Internet and boards as of late, and thought they would be perfect for
mother’s day cards.
I usually do most of
my designs on paper first. Then I go
into the Cricut Craft Room or Design Studio and find what I have that can be
manipulated to make my project.

The flowerpot itself is the cupcake image on AP with a welded rectangle and scallop added. Copy the welded flowerpot and flip the copy and weld the two bottoms together.
I actually used the Art Philosophy
cart to most of the pieces on them.
I did use Walk in my Garden for the leaves on the violets, however.
I hand cut the tags for the front and the inside and added a little stand in the back (also cut by hand).
Supplies: I used some of My Creative Time stamps and a few others as well as, ribbon, floss,
buttons, puffy paint (yellow centers), eyelets, and tape. Cricut Craft Room (it’s free), Art Philosophy
cart and Walk in My Garden Cart.
This was really super easy project and I love how they
turned out. I used my computer to type
the “Happy Mother’s Day” inside.
God Bless and Happy Scrapin’
 |
| I think they look so cheery! |


These are just lovely! Nice colors with the ribbon, inking, and buttons. I love all of the designs!
ReplyDeleteThanks for your nice comment.
DeleteHappy Scrapin' and God Bless