Followers (I'd love to have you join)

Showing posts with label Banner. Show all posts

Friday, January 27, 2017

Dory Birthday Banner (Happy 70th Mom)

 My mom just turned 70 this week and she just loves Ellen and Dory. 
 So... I had to make her a Dory banner


Everything I needed was in Cricut Design Space

Supplies:
  • Cricut Explore Air (with Access in Cricut Design Space)
  • Carts - Simply Sweet, Animal Antics, Hello Kitty, Sabrina, Beyond Birthday, Chalk Board Fonts, Create a Critter, Nemo and Friends, Life is a beach (many available with Access but licensed carts require a purchase )
  • Backers twine  - in bright coordinating colors
  • Cardstock - Tiffany blue, Blue, Lt green, Bright yellow, Orange, Pink, light teal, black, white
  • Print- for print than cut (Dory and Nemo)
  • Notebook circle protectors,
  • Adhesive - Tombow, Liquid glass (CTMH), Pop Dots
  • Pompom cord - sage green
  • Pinterest - inspiration from  karlaspartycreations (Esty)
Places I am sharing

613 Avenue Create - anything goes - closes 2 Feb 2107
Jo's Scrap Shack - Anything goes - Closes 2 Feb 2017
Penny's Paper Crafty Challenge - Anything goes - closes 31 Jan 2017

Saturday, October 22, 2016

Boo - Altered Wooden Letters in a Spooky-Cute Combo

Sorry I have been missing -  I was busy preparing for the Craft Fair for the last month (was last Saturday and went very well!)

As I type this I am enjoying the nice cool fall weather we finally have here in south Texas!

My latest craft fair project was this cute (yet spooky) BOO décor.

I took the basic wooden letters (on sale from Hobby Lobby) and witch doctored them up!

What do you think? (details bellow)


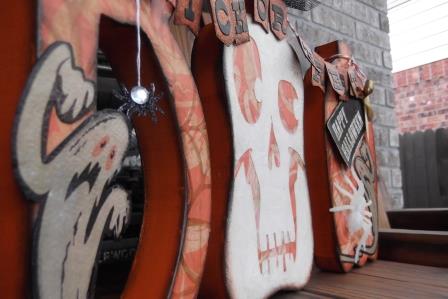
CRFAT FAIR NOTES: I had this for sale at the craft fair for $10 - however, a very nice lady stopping said she had just purchased some "boo blocks" that were no where near as cute as mine for $15.  She said she would feel guilty buying my for that price with all the work I put into them, so... when she didn't buy them I decided I'd like to keep them for myself and raised the price to $20 -  people asked but no one bought.  I sold lots of snowmen (later post)  sold some Witch hats and Gnomes (later post) and the thing I sold most of was my wilted pathetic ghosts" -  the Ghost got all ruined in the humidity (starch and cheese cloth) and I thought I was going to have to give then away or trash them but once I added the word "pet" they flew off like, well ghosts!


peek at the back side
Supplies:
  • Carta Bella Halloween "Trick or Treat"  - ( I love the vintage look and feel of this paper)
  • Glitter gem spider stickers - Hobby Lobby - dangling from center of "B"
  • Orange spray paint (base - sprayed around all edges (except bottom)
  • Inks - black, brown, white (CTMH)
  • Embossing powder on "Happy Halloween" tag  (white and gold mixed -  I used CTMH white and Recollections clear gold)
  • Stamp "Happy Halloween" - CTMH - Perfect Fit-Halloween B1413
  • Tag - Die cut from Hot off the Press - 10 Tags and Trims set
  • Sandpaper, file, sanding block (for all edges after I glued the papers down)
  • Glue
  • Glitter paper  - by The Paper Studio
  • We R Memory Keepers Alphabet die (for letters in "Trick or Treat" banner)  had a really hard time trying to get theses to work right in my Cricut
  • Circut (banners and skeleton face) - Access (not sue want carts) (cut banners and folded in half over backers twin)
  • Bakers twine
  • Mod Podge and Mod Podge brush (love their brand brushes work together perfectly!)
  • Glow in the dark spider (Dollar Tree pack)
  • Black and Cream Cardstock
  • Ribbon (brown and cream stripped) - CTMH
  • ribbon - Gold - Anna Griffin stash
  • Embossing folder - Spider wed - Anna Griffin Seasonal Folders - Fall (embossed all the base paper with this before gluing down

Sharing on:

Bitten by the Bug 2 - Halloween -(closes 24 October)
CropStop - Linky Party #21 Anything goes - (closed around 10 November)
Cut it Up - Challenge #107  Pumpkins (closes 27 October)
Dies R Us - Challenge #59 Fall / Halloween (closes 28 October)
Die Cut Diva's - Emboss (wet or dry - I did both) (Closes 31 October)
DL ART - Thankful Thursday Challenge 3190 - Halloween (Closes 28 October)
Little Scraps Piece - Show it Off Linky Party (Closes 22 October)
Simply Create Too - #120  Halloween (Closes 28 October)

Feel free to comment or ask question and God Bless and happy Scrappin'
Be Safe This Fall Ya'lll

Monday, April 2, 2012

HOPPY BIRTHDAY EASTER BANNER


I love making banners.  So fun and easy, and I figured some things out by trial and error along the way.  Try it out and let me know what you think.  I’d love to hear comments if my info is helpful for you at all.

The first banner I made was for my son; his birthday is close to  Easter every so often so last year I made a banner that says “Hoppy Birthday” and is Easter teamed.  I printed all the patterned papers with my Imagine and cut most of the solids with regular card stock on my expression.  I used Nursery Tails for the patterns, Hello Kitty Font for the letters and bunny images from Nursery Tails and Create A Critter. I added a few balloons and party hats to the bunny’s (also from Create A Critter).

Now,  let’s talk about accordion medallions.  These look so cool I just had to try them out.
First, I scored an entire 12X12 sheet at ¼ intervals.  Then I cut them in to 1 ½ inch strips.  (This only took 3 sheets of blue card stock for 23 medallions at 8 per sheet). 
TIP 1:  Next time I would cut them at 2 inch per strip- it makes for a smaller center opening on the medallions that is much easier to work with when hot gluing them in position.  It only would have cost me one more piece of paper and a lot less frustration. 


Next, I folded them accordion style – easy-peasy.  I used glue dots to put the ends together – still easy.  The hard part was getting the accordion medallion to lay flat and stay stuck to the banner.  


TIP 2: in hindsight – USE a GLUE GUN.  That and wider strips would have been so much easier.  I was so frustrated with them I said I wouldn’t make them again, until I remembered my glue gun.  Also, you can see I strong this entire banner on one LONG ribbon – uhgg. 


TIP 3: Tie with individual ribbons between each pinafore, not one long one. 


Pinafores: I positioned the cut files two to a page (one up, one down) and used coordinating patterns from Nursery Tails Imagine cartridge to fill them in.  I stacked them all up and used my Crop-a-Dile to punch holes through the entire sack on the top two corners to run the ribbon through.

Hope you enjoyed my banner.  God Bless & Happy Scrapin'