Followers (I'd love to have you join)

Showing posts with label Create A Critter. Show all posts

Thursday, August 23, 2012

School is Back in Session - Bulletin Boards


Okay, school is back in session, so I wanted to share a few things I made for one of my sons previous teachers.

 
First is a bulletin board for the birthdays of the children in the class.  I used Create-a-Critter for the candle flame and balloons and I used Storybook for the big letters.  I used regular construction paper and laminated it.  Laminated paper cut wonderfully on the expression.  I used colored laminated copy paper for the various candle colors.

---------


The next bulletin board I did was the Accelerated Reader board.  We are the Sipple Stallions so the teacher thought it would be cute to use little horses for the board.  I cutout the bookmarks from the Animal Kingdom cart and I also used Platian Schoolbook, and Hello Kitty Font.  Again I cut these from laminated construction papers and they held up nicely the entire school year.  -- Opps, don't have a picture of this one.

----------

Now for my favorite project.  This was so fun to make.  It is a homework reward board.  The teacher found the idea on-line and she just wanted me to copy it and then color it – I HAD BIGGER IDEAS.  Here is what I came up with.  I used several carts on this  – Everyday Paper Dolls, Plantain Schoolbook, Hello Kitty Font, Life’s a Beach, and Locker Talk-- sorry I do not have all the measurement for this.  I printed the game cards on the computer.  This was fun for the kids and they used it all year.


--------------

Another thing I did d for the classroom was decorate the door for end of year testing.  They have a little competition each year to encourage the students.  Here is the door I did for her.  I used Plantin Schoolbook, Walk in my Garden and Create a Critter for the little inch worm.

   I inked the edges and curled the petals – I thought the colors were nice and bight.

 
Sorry this is a side veiw -  It is from my phone and i can't seem to turn it.

Friday, June 29, 2012

"Chillin'" - Hot Summer Colors Challenge

Wanted to share this cute card I posted for the “Hot Summer Color” challenge over on  My craft Spot .  I use some cool colors too– It has been so hot here in Texas (in the 100s this week) – I just had to cool this little penguin down. I think he is so cute! 

Penguin:  From ZooBalloo  (one of three)  with a tweaked beak so he could suck the straw
Sun:  Just Because Cards (sunflower)
Sunglasses:  Create-A-Critter (cut in half)
Lemonade glass:  Just Because Cards
Waves: Stand and Salute
Sand: Paper Dolls for Everyday
“Chillin’”: Create-A-Critter
Papers:  The blue “sky” paper is from a boy stack, that I don’t have the name of.  I used open cardstock and sandpaper for the sand.  I used Prismatic Paper Pack  from Best Occasions for the sun and the shades shinny parts . 
Straw: A little piece of silver elastic ribbon
 

This made a nice card for one of the neighbor boy’s birthday.  Hope you are staying cool in the hot summer “colors”.


Happy Summer, God Bless and Happy Scrapin’!

Monday, April 2, 2012

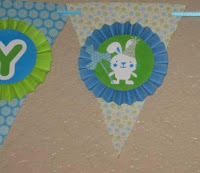
HOPPY BIRTHDAY EASTER BANNER


I love making banners.  So fun and easy, and I figured some things out by trial and error along the way.  Try it out and let me know what you think.  I’d love to hear comments if my info is helpful for you at all.

The first banner I made was for my son; his birthday is close to  Easter every so often so last year I made a banner that says “Hoppy Birthday” and is Easter teamed.  I printed all the patterned papers with my Imagine and cut most of the solids with regular card stock on my expression.  I used Nursery Tails for the patterns, Hello Kitty Font for the letters and bunny images from Nursery Tails and Create A Critter. I added a few balloons and party hats to the bunny’s (also from Create A Critter).

Now,  let’s talk about accordion medallions.  These look so cool I just had to try them out.
First, I scored an entire 12X12 sheet at ¼ intervals.  Then I cut them in to 1 ½ inch strips.  (This only took 3 sheets of blue card stock for 23 medallions at 8 per sheet). 
TIP 1:  Next time I would cut them at 2 inch per strip- it makes for a smaller center opening on the medallions that is much easier to work with when hot gluing them in position.  It only would have cost me one more piece of paper and a lot less frustration. 


Next, I folded them accordion style – easy-peasy.  I used glue dots to put the ends together – still easy.  The hard part was getting the accordion medallion to lay flat and stay stuck to the banner.  


TIP 2: in hindsight – USE a GLUE GUN.  That and wider strips would have been so much easier.  I was so frustrated with them I said I wouldn’t make them again, until I remembered my glue gun.  Also, you can see I strong this entire banner on one LONG ribbon – uhgg. 


TIP 3: Tie with individual ribbons between each pinafore, not one long one. 


Pinafores: I positioned the cut files two to a page (one up, one down) and used coordinating patterns from Nursery Tails Imagine cartridge to fill them in.  I stacked them all up and used my Crop-a-Dile to punch holes through the entire sack on the top two corners to run the ribbon through.

Hope you enjoyed my banner.  God Bless & Happy Scrapin'

Wednesday, March 14, 2012

Just Ducky - Baby Gift

This was super easy!  I put these together for some twins of an acquaintance.  I scrap-lifted the idea and added my own flare.  The idea was posted by craftycathryn on the circuit forum.  Hers are supper cute – she has the large Peachy Keen stamp set for the faces (you can see them on her blog In the Pink Designs, by cathryn here.  I love the way hers look so bright & cheery.  For mine, I added a receiving blanket wrapped around the packages of wipes.   

Duck features:    First, cut a sheet of paper to fit around each package.  I did not have the big peachy keen stamps so I had to piece- mill them together in the Cricut Craft Room.  I actually wielded two light bulbs ornaments from Create-A-Critter cart to make the duckbill, and then I used a sign shape for the feet.  Then cut in half, what I think was a pillow, for the individual wings ( all from Create A critter).  I inked the edges of everything, added two brads each for the eyes, then made a quick little card using Nursery Tails.


Thanks for looking

God Bless &  Happy Scrapin’

Friday, October 21, 2011

Don't Croak Grandparents Day Card

Here is a crazy fun Grandparents day card I made using that adorable frog/toad on Mini Monsters and the cute Dragonfly form Create-A-Critter.


 I was always forgetting grandparent’s day – and I was tired of getting scolded for it, but last year I remembered.  The front says “don’t crock” (also from Mini Monsters.)  Inside says, “…but mom finally remembered grandparents’ day”.  As you can see, I cut out faces of my boy’s and put it on the dragonfly bodies – The grandparents  loved it – with little picture of the grandkids how could they not?

Frog cut @ 5.7 by 3.5 and cuddlebugged his legs

Dragonflies cut @ 2.6 by 2.2 and 2.1 by 1.5 (I used double-layered velum for the wings and added stickles & smooch to the bodies).

“Don’t Crock” cut at 2.3 by 1.6 in two colors (hid contour for bottom layer)

The tongue was actually cut from a Give-a-Hoot boarder and stretched and cut to fit

I used some ink and hand cut the lily pad.

 Here are some similar cards I made at the same time.     


Happy scrappin’ and God bless!

Sunday, October 31, 2010

ABC Animal Book (Deployment gift)


I have a neighbor who is very sad about going TDY (Temporary Duty) for 6 months to Afghanistan (no they really don’t seem to be pulling out). She will miss all the holidays and birthdays for her 3 small children (ages: almost 1, soon to be 3, and 5 in spring). I wanted to do something to help her stay in touch with the kids.


I immediately thought of little cute cards for her to send home to them. I finally decided on a card a week, and thought that ABC card would be fun. I told her, she can tell the kids, she will be home before “Z”. I wanted the little ones to be able to see all the little animal cards mommy was sending home so I made up an album and place corner tabs for every card with a little label that said the name of the animal and the letter it represented. The front of the book says “How may weeks until mommy is home? Count the missing animals to find out” .


My hope is that it will be fun way for her to keep in touch and a cute way for the children to count down the weeks until she gets home. I also added a birthday card for each child and card for each holiday she will miss.

With all the work I put into this, it surprisingly only took 5 days from start to finish. I packaged all the cards up in a little box for her to pack in her bags, and gave the kids (and dad) the Blank Album to put the cards in as she sends them home. I left plenty of space for pictures of mommy in th front and back of the album  -- so the kids can “see her” as they look at all the cards she sent to them. I was going to pre-pay the postage for each card but have since found out that the military covers the coast of postage for our deployed troops.

I cut all the animals at what ever size each would have a good fit on a 4X 6 card.

I used only five cartridges on this project: Animal Kingdom, Create-a-critter, Designer Calander, Everyday Paper Dolls, and Zooballoo.


I printed the cover using Microsoft office and I used old sticker letters to place in the corner of each card. I also embellished come cards with googol eyes, stickles, brads & gems. I added a note of caution “not safe for children under 3” but hope it will be a book that the kids will share with an adult.

Thursday, October 14, 2010

My Cricut Circle Blog Weekly Challange Entery

Hi All! Long time no post, But I am back in action!!!

Here is my entry for the Circut Circle Blog Weekly challenge.


It was: Weekly Challenge #2: THINK PINK!
Use Pink, Ruffles, Scallops, Flourishes, Glitter and Jewels ( incorporate any 3 on your project)
In honor of Breast Cancer Awareness month we wanted to do an ultra girly challenge to celebrate the strength of girls. Create a project of your choice (card, scrapbook page, home decor project, . . . the sky’s the limit!). Project must be newly created for this challenge and must include atleast 2 cuts to qualify. This challenge is open to Cricut Circle Members only. Submit your entry using the InLinkz tool found at the bottom of this post. You must submit a project to be entered into the drawing. Entries are due by 11:59 pm MST on Thursday, October 14th, 2010.

While my layout is not Pink, it does have flowers/flourish, glitter, jewels, scallops & ruffled ribbon. That’s fairly girly wouldn’t you say?

Anyways – this is a page I created today for the challenge – although we got our dog 5 years ago – I am, however slowly, working on my Album for 2005 - UUUUAAAGGGGGHH!!!!

I used the following cartridges:
A Child’s Year - for the frames, silhouette of dog & boy, & for the scalloped nameplate
Plantin Schoolbook – for the lettering
Create-A-Critter – for the words “Ruff Ruff” and the dog bowl
And I am so excited to say I also used the Imagine cartridge Best Friends – for the large checkered background pattern and elegant shape!

Other supplies:
Patterned paw print paper - sorry don’t know where I got it
Open Card stock in white, black, & red
Red ruffled Ribbon
Red cord (on Collar)
Jewels – one clear and 3 red (one collar & center of flowers)
One silver brad
Flowers – black & white ones are Making Memories brand & the three white layered on top are from a forgotten supply
Also, I used my white opaque pen and my crystal glitter pen
Adhesives – Glue Dots, Scotch scrapbooking, Xyron, and my pink Herma Vario EK tab runner

HOPE YOU ENJOY!

I have a LOT of summer/fall posts I’ll be adding in November so check back then!

As always, Happy Scrapen’ & God Bless!

Friday, July 30, 2010

Birthday "Tweet" Cards

Here are two similar Birthday Cards I made.  One is for a Dear Friend and the other for my  DML. 
They are popped and the bird houses swing back and forth.


Inside tweet tweet: - "Hope Your Bird-thdays Very Sweet"
Inside Hi Chick:     - "Hope Your Bird-thdays Very Tweet"

What I used:
Create a Critter Cricut Cartridge

Mini Mosaic embossing folder for the bird houses

Patterned papers are both from DCWV Premium Stacks Citrus Matstack

One brad each and 2-4 little chain links on top of bird houses

Bird faces - Stamps from Peachy Keen - PK-754 Critter Faces SET A medium (very cute)

Various inks
Blue gems for eyes


Note: Please don't ask what size I cut stuff at - I use Design Studio and just make it at a size that fist the card and design I plan to use.