Followers (I'd love to have you join)

Showing posts with label A Child's Year. Show all posts

Sunday, August 19, 2012

SO OLD SCHOOL (Layout)

Hey Scrapers,

I just wanted to share my layout using the papers in the CTMH Scholastic workshop on the go kit. (Our Sptember Neighborhood Club Kit)

I used the Art Philosophy for the chalkboard frame, Artiste for the card file cards and for the title, and , A Childs Year for the apple.  I was having a designer block with this paper pack, but it finally came together and looks great – better than I expected anyway.

I used the new chalkboard paper for the black board, and also used liquid glass on the apple.  I also used the cuttlebug and the woodgrain folder for the board frame.   In addition to the exclusive stamp set included in the Scholastic kit, I also used the Approved Stamp set.  I did scrap lift the card file and the stacked books from the CTMH Idea Book -- it is defiantly filed with great ideas!

Hope you enjoyed my old school layout!
God Bless and Happy Scrappin'!

Sunday, April 8, 2012

Happy Easter -- Simple Gifts

Hello Friends. Family, and Followers,

I just wanted to share some quick Easter crafts with you. 


First, I made some supper easy candybar wrappers with the imagine and Nursery Tails.  I layered some patterns and images and added a monogram initial from A Child’s Year.  Since the Imagine and Cricut Craft Room (CCR) still don’t know how to cut and print a multilayered image without cutting all the layers into pieces, I only printed and then hand-cut the rectangle shape with my paper cutter.  Easy Peasy. 

Hey, did you notice -- Organic Chocolate?  We have been trying to eat healthy, fresh, natural, and organic – Who knew they could make chocolate even better for you --- Wooo Hooo!!


Next, I made some simple bunny Action Wobble head gift cardholders.  My kids are older, so I make a lot of gift cardholder these days.  Just used some stretched ovals, circles, ink, gem eyes, gamit glue, and ribbon – simple simple simple!  Then place I-tune cards inside and you’re done.


 Then I made the unhealthy stuff for the neighborhood kids.  Little Debbie brownie eggs with nerd feet turned in to cute little bunnies!  Stretched a tag from Art Philosophy cart for the carrot, added “Jesus Luvs U!“  -- my way to let them know it’s about Jesus.  The head shape is a folded shape from Art Philosophy again.


Simple Easter gifts – Hope you enjoyed my post.

God Bless and Happy Scrappin’!


Thursday, October 20, 2011

Halloween Goodie -- THIS MADE THE CHIRP!!!!

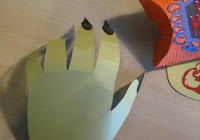
I made these treat boxes for my boys.

The Pillow Box:
I made these big enough to hold a large gift card and a small candy bar.  The bigger gift cards are 3½ by 5 inches, so I needed to make the pillow box at 9.5 wide & 8.5 high.  These were cut from the awesome Art Philosophy cart by Close to my Hear.  I folded on the long score marks and ran them thru the cuttlebug.  They needed to go thru twice to cover the entire length of the box.  


The Hand:
This was cut at 6.9 by 7.2 (this was elongated a bit).  And similar to a card I made last year using the same hand from A Child’s Year.  I used a raindrop and turned and wielded them in DS to make them look like sharp fingernails.  I painted the nails with smooch and covered them with Liquid glass ( I let dry over night).  Then I rolled and bent the fingers in a natural way.


The Label:
This decretive label was cut from a frame on Happy Haunting as was the phrase “Happy Halloween” and the letters.  I also used the liquid glass on the words & letters to make it look like fresh blood.  The frame was cut at 3.05 by 4.5 and base of the frame /back was cut at 3.38 by 4.5. 

Final Touches:
After gluing everything in place, I added various wiggle eyes with glue dots, a black ribbon topped with a blood red gem, and place box in hand - presto. 


Hope you like it.  Happy Haunting to you and all your goules have a safe and scary Halloween!

God bless!

Monday, November 1, 2010

A Halloween and a Fall Layout

 Trick-or-Treat


The spider was cut from the Designer Calendar cart and her head is an apple shape from the Celebrate with Flourish cart -- pop-dotted for depth. The spider has 2 red brads for eyes, a scrap of white for fangs, and a mini pom-pom for her egg sack. She is covered with paper glaze to get the shiny look. I used the same Celebrate with Flourish cart for the title “Trick-or-treat”. Various sizes of a card base from A Child’s Year were used for the photo mats. The layout was topped-off with brads and spider ribbon. I belive the patterned paper is by Creative Imaginations.

Happy Fall Y’all!
This layout was originally for a challenge on the cricut circle board a month or so ago, but I was not able to post it in time. .


I used the Old West cart for the nice box lettering. The scarecrow, tree, and fall leaves all came from the Celebrate with Flourish lite cart. A jack-o-lantern was cut from a sheet of paper and used for the scarecrow’s head. The moon is just a plain circle, cropped. A “ribbon hole” punch was used on the layered rectangle frame and a soft sage green ribbon was weaved thru for the final touch. Sorry, I do not recall who the fall patterned paper is by.

Thursday, October 21, 2010

Here is a little Halloween Card I wanted to share.


The hand opens, not the whole card. The inside says “Eye, just wanted to thank you”. This could also say “Eye wanted to invite you…” or “Eye wanted to say Happy Halloween”, etc... Whatever suits your fancy.

I did not have a scary Halloween Hand - I didn’t freak -- I just wield one with the wonderful Design Studio. I used A Childs Year for the hands. I wielded two hands together (one was flipped)  --this way the hands would fold open to present the eyeball. I turned and wielded tiny ice cream cones of various sizes (from Designer Calendar cart) to make the creepy fingernails and warts. I colored the fingernails with a black marker (inside and out), painted the tips with siren Smooch (for the blood-look), and topped them off with Paper Glaze, for that shiny look. I drew some details on the hands and did a little shading with ink.

For the eye--- I actually cut the colored circles with the Cricut Imagine – I got the perfect shade of blue and off-white this way. I glued the circles together, used my white opaque marker for “light”, and added tiny bloodshot lines with a red pen. I topped of the eyeball with the Paper Glaze, to make it look wet. Lastly, I pop-dotted the eye on the inside of the hand.

The little spider was also cut from the Designer Calendar cart. I added a pop-dotted circle head on him and covered him in paper glaze, as well,  and used the same Smooch (as on the fingertips) for his red eyes. He is dangling from a piece of dental floss.

DETAILS & SUPPLIES
This is a 4.5 x 6.5 card.
Background paper is from DCWV – La Crème Mat Stack
Each hand cut at W4.45 x H4.76
Red accents - siren Smooch and a red Sakura Glaze pen
Cricut Expressions
Cricut Imagine
Cartridges: A Childs Year and Designer Calendar
Pop dots
Paper Glaze
Open card stock (white, “witch” green & black)
Glue and Adhesives very

I am veryt pleased with the results!
Happy Hunting’s, God bless, be safe & enjoy the season!

P.S. I AM LOVING THE CRICUT CIRCLE BLOG!!!

Thursday, October 14, 2010

My Cricut Circle Blog Weekly Challange Entery

Hi All! Long time no post, But I am back in action!!!

Here is my entry for the Circut Circle Blog Weekly challenge.


It was: Weekly Challenge #2: THINK PINK!
Use Pink, Ruffles, Scallops, Flourishes, Glitter and Jewels ( incorporate any 3 on your project)
In honor of Breast Cancer Awareness month we wanted to do an ultra girly challenge to celebrate the strength of girls. Create a project of your choice (card, scrapbook page, home decor project, . . . the sky’s the limit!). Project must be newly created for this challenge and must include atleast 2 cuts to qualify. This challenge is open to Cricut Circle Members only. Submit your entry using the InLinkz tool found at the bottom of this post. You must submit a project to be entered into the drawing. Entries are due by 11:59 pm MST on Thursday, October 14th, 2010.

While my layout is not Pink, it does have flowers/flourish, glitter, jewels, scallops & ruffled ribbon. That’s fairly girly wouldn’t you say?

Anyways – this is a page I created today for the challenge – although we got our dog 5 years ago – I am, however slowly, working on my Album for 2005 - UUUUAAAGGGGGHH!!!!

I used the following cartridges:
A Child’s Year - for the frames, silhouette of dog & boy, & for the scalloped nameplate
Plantin Schoolbook – for the lettering
Create-A-Critter – for the words “Ruff Ruff” and the dog bowl
And I am so excited to say I also used the Imagine cartridge Best Friends – for the large checkered background pattern and elegant shape!

Other supplies:
Patterned paw print paper - sorry don’t know where I got it
Open Card stock in white, black, & red
Red ruffled Ribbon
Red cord (on Collar)
Jewels – one clear and 3 red (one collar & center of flowers)
One silver brad
Flowers – black & white ones are Making Memories brand & the three white layered on top are from a forgotten supply
Also, I used my white opaque pen and my crystal glitter pen
Adhesives – Glue Dots, Scotch scrapbooking, Xyron, and my pink Herma Vario EK tab runner

HOPE YOU ENJOY!

I have a LOT of summer/fall posts I’ll be adding in November so check back then!

As always, Happy Scrapen’ & God Bless!