Followers (I'd love to have you join)

Showing posts with label Hello Kitty Font. Show all posts

Thursday, November 15, 2012

Fall Layouts

November Club Layouts 

These layouts feature the CTMH Flirty paper pack and Dimensional Elements.  Obviously I used my indispensable Cricut and my Imagine. 
For the 1st layout I used Hello Kitty Font (for font), and Art Philosophy for all the leaves and acorns.  I also used CTMH Stamp set Harvest Happiness to stamp all the leaves and acorns in several fall colors.  I added the CTMH Burlap Ribbon for texture.


 On the 2nd layout, I used the Imagine Enjoy the Season cart.  I just changed the colors to match the CTMH papers.  Came out so cute- I love these pages.


Happy Fall Ya’ll

Thursday, August 23, 2012

School is Back in Session - Bulletin Boards


Okay, school is back in session, so I wanted to share a few things I made for one of my sons previous teachers.

 
First is a bulletin board for the birthdays of the children in the class.  I used Create-a-Critter for the candle flame and balloons and I used Storybook for the big letters.  I used regular construction paper and laminated it.  Laminated paper cut wonderfully on the expression.  I used colored laminated copy paper for the various candle colors.

---------


The next bulletin board I did was the Accelerated Reader board.  We are the Sipple Stallions so the teacher thought it would be cute to use little horses for the board.  I cutout the bookmarks from the Animal Kingdom cart and I also used Platian Schoolbook, and Hello Kitty Font.  Again I cut these from laminated construction papers and they held up nicely the entire school year.  -- Opps, don't have a picture of this one.

----------

Now for my favorite project.  This was so fun to make.  It is a homework reward board.  The teacher found the idea on-line and she just wanted me to copy it and then color it – I HAD BIGGER IDEAS.  Here is what I came up with.  I used several carts on this  Everyday Paper Dolls, Plantain Schoolbook, Hello Kitty Font, Life’s a Beach, and Locker Talk-- sorry I do not have all the measurement for this.  I printed the game cards on the computer.  This was fun for the kids and they used it all year.


--------------

Another thing I did d for the classroom was decorate the door for end of year testing.  They have a little competition each year to encourage the students.  Here is the door I did for her.  I used Plantin Schoolbook, Walk in my Garden and Create a Critter for the little inch worm.

   I inked the edges and curled the petals – I thought the colors were nice and bight.

 
Sorry this is a side veiw -  It is from my phone and i can't seem to turn it.

Monday, April 2, 2012

HOPPY BIRTHDAY EASTER BANNER


I love making banners.  So fun and easy, and I figured some things out by trial and error along the way.  Try it out and let me know what you think.  I’d love to hear comments if my info is helpful for you at all.

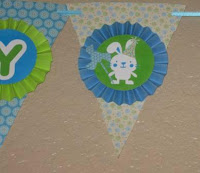
The first banner I made was for my son; his birthday is close to  Easter every so often so last year I made a banner that says “Hoppy Birthday” and is Easter teamed.  I printed all the patterned papers with my Imagine and cut most of the solids with regular card stock on my expression.  I used Nursery Tails for the patterns, Hello Kitty Font for the letters and bunny images from Nursery Tails and Create A Critter. I added a few balloons and party hats to the bunny’s (also from Create A Critter).

Now,  let’s talk about accordion medallions.  These look so cool I just had to try them out.
First, I scored an entire 12X12 sheet at ¼ intervals.  Then I cut them in to 1 ½ inch strips.  (This only took 3 sheets of blue card stock for 23 medallions at 8 per sheet). 
TIP 1:  Next time I would cut them at 2 inch per strip- it makes for a smaller center opening on the medallions that is much easier to work with when hot gluing them in position.  It only would have cost me one more piece of paper and a lot less frustration. 


Next, I folded them accordion style – easy-peasy.  I used glue dots to put the ends together – still easy.  The hard part was getting the accordion medallion to lay flat and stay stuck to the banner.  


TIP 2: in hindsight – USE a GLUE GUN.  That and wider strips would have been so much easier.  I was so frustrated with them I said I wouldn’t make them again, until I remembered my glue gun.  Also, you can see I strong this entire banner on one LONG ribbon – uhgg. 


TIP 3: Tie with individual ribbons between each pinafore, not one long one. 


Pinafores: I positioned the cut files two to a page (one up, one down) and used coordinating patterns from Nursery Tails Imagine cartridge to fill them in.  I stacked them all up and used my Crop-a-Dile to punch holes through the entire sack on the top two corners to run the ribbon through.

Hope you enjoyed my banner.  God Bless & Happy Scrapin'

Monday, March 12, 2012

Hug Bug Layout

 Hello to all you happy scrapers.  I have another Scrapbook page to share today.  Two pages in one week--I am on a roll!!!

This super cute background paper is from the Paper Loft “Slug Bug” collection.  It has little poke-a-dotted VW bugs all over it.  I found it at the Creating Keepsakes Convention  on a bargain bin. As soon as I saw it I knew I had to do a page about the bug I owned when I was 20 (no doing the math – it was 1980 something…late something).

 The letters are cut at 1 inch from Hello Kitty Font cart and the flowers are from the CTMH Art Philosophy cart!


I used my imagine to get just the right colors to match the background paper.  I have a bookmark-tag tucked in behind the bottom photo for journaling the story of my bug.

I was real excited about using pink!!  I have two boys so I don’t get to scrap in pink very often – Love it!

Enjoy, God Bless and Happy Scrapin’!

Saturday, October 30, 2010

Cricut blog’s monthly challenge - October

Here is my entry for the Cricut blog’s monthly challenge.


October’s challenge was  CELEBRATING CREATIVITY

We were to create a scrapbook page or a home décor project. I choose a home décor piece. I thought it should be a big deal for the wonderful prize they are giving away – A Scrap Box.

The project needed to:
1. Include at least 2 cuts
2. Use the shadow feature
3. Use patterned paper
4. Embellish at lease one of the cuts

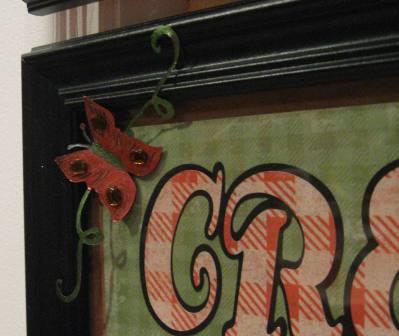
I used Hello Kitty font cart for all the lettering and welded the words in design studio. I also used the shadow feature for the lettering. The butterflies I cut from the Storybook cart.
For the patterned paper I printed full sheet on my new Imagine using the patterns on the Imagine More cart.
I used gems and Smooch on the butterflies.
The frames were just $3 each from Wall Mart.  I used some nice golden fall colored ribbon to finish it up.

 It looks great in my kitchen!


Enjoy and God Bless!